DIY kitchen project: make your own potholder
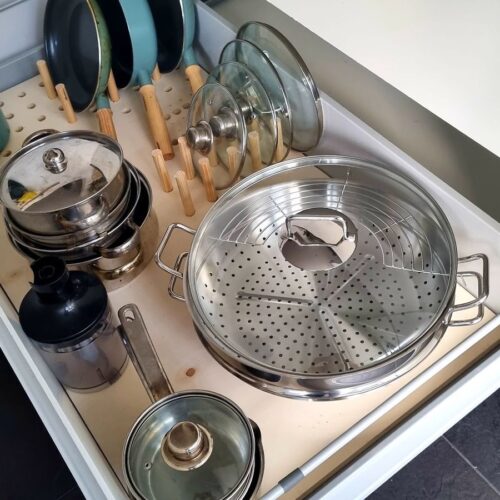
Storing pans will never be a frustration again with this pegboard that you can very easily make yourself. Before you go to the hardware store, measure the length and width of the bottom of your kitchen drawer. Got this written down? Come on, let's get to work!
Kitchenware
- nice thick plywood board(Avoid hardwood, as a speed drill won't get through this. I chose 18 mm poplar plywood. Have the board cut to size at the hardware store).
- long round stick with a diameter of 18 mm
- fine sandpaper (180 grit)
- pencil
- tape measure
- 17 mm speed drill(Note: the diameter of the drill is deliberately 1 mm smaller than the stick! Hand drill preferably with plug saw (preferably with a miter box.)
Instructions
Pegboard making
- Depending on the dimensions of your board, you need to think about the grid of your board. The grid is the distance of the drill holes where the pegs will later go. An example: my plate is 58 x 106 cm. I choose a distance of 5.25 cm between the holes, so I could fit exactly 10 holes in width (11 x 5.25 ≈ 58 cm).
- Draw this 'grid' on the plate with pencil and drill the holes with the speed drill. I ended up choosing to drill only the holes I needed for my stuff. But of course, you can also drill the entire grid.
- Gently sand the edges of the holes with fine sandpaper. I used 180-grit sandpaper.
- Cut the round stick into equal sections to function as 'pegs'. I chose a length of 10.5 cm and used a miter box to ensure a straight cut.
- Put the plate on the bottom of your kitchen drawer and place the 'pegs' in convenient places for your utensils. Gently play hammer tap the peg so that it goes all the way through your plate.
- Rearrange the pan drawer to your liking and enjoy your tidy Marie Kondo style kitchen.
Your potholder will be prettier with these (speed) drilling tips
- When drilling through, the back side often becomes less attractive, especially with a plywood board. For this reason, always start your drill on the side you want to show.
- To prevent the back of the plywood from cracking when drilling, only drill deep enough until the tip of your chuck is through.
- Then turn the plate over and drill out the hole from the back.
- A speed drill expects high speed (hence the name). Preferably take a drill with a plug (not a cordless drill), which can operate at high speed and power.
- Put the tip of the speed drill on your plate, and let the drill reach maximum speed before pushing it into the material.