DIY: upcycle your old plant pot
We'll show you step by step how to stack two pots on top of each other and turn them into a unique object that no one else has. Whether you go for a sleek design, a colourful face or an artistic print: anything goes. You don't need much, just some time, patience and a touch of creativity.
Tools
- old flower pots(all types are suitable, both plastic and ceramic)
- Strong glue(e.g. epoxy adhesive or assembly adhesive)
- Primer
- acrylic paint
- acrylic paint pens
- pencil
- brushes
- sandpaper
Instructions
- Find two jars that fit well together. Try different combinations and turn them over: the bottom jar can just as well be upside down!
- Lightly sand the pots. This will help the paint adhere better. Then, clean everything thoroughly with a cloth.
- Glue the pots together. Let them dry thoroughly (check your glue's packaging for drying time).
- Paint the pots with primer. One coat is often enough, but feel free to slap on a second. Don't forget the edges!
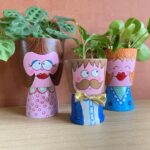
- Sketch your design in pencil. Need inspiration? Check out the cheerful creations by Silvia Zacchello. Her hand-painted pots are a joy to behold.
- Fill the large areas with acrylic paint.
- Let everything dry thoroughly and finish with acrylic markers. Time for the fine details: lines, eyes, flowers, moustaches – go wild!
- Do you want to protect your artwork? Then apply a layer of varnish. Just make sure everything is completely dry, otherwise the markers might run.
- For the finishing touch: use up leftovers! Think of old sunglasses, beads, ribbons or a gold bow – you can also upcycle with your craft box.
Notes
I painted a face on both the front and back of the pot. Will you put it in front of the window? Then it will smile cheerfully at you from the street too!