Sashiko mending: a Japanese clothing repair technique
Hello textile bin! Surely a big hole means the end of a garment for many people. A repair often doesn't turn out very nice. Unless you turn the repair work into a work of art in itself. One way to do this is with the Japanese technique Sashiko, which is not at all complicated to learn.
Tools
- needle
- sewing thread
- embroidery thread
- scissors
- ruler
- pencil or erasable pen
Instructions
- Place a piece of fabric behind the tear or behind the hole. Make sure your piece of fabric is bigger than the hole. Secure the piece of fabric by using your sewing thread with basting stitches. You can do this with any colour, as you remove this thread at the end. It is only meant to secure the piece of fabric for a while. You can also use a little fabric glue, but not too thick or you won't be able to get through it with your needle and thread.
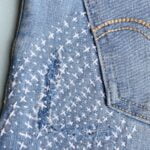
- On the front, draw a checkerboard pattern with an erasable pen (which disappears with heat) or a pencil (for dark fabrics, use a white or yellow pencil).
- Now make running stitches with embroidery thread over the lines you have drawn. First horizontally, when you go vertical, create small crosses. You can choose to choose a thread in the colour of the fabric or just a contrasting colour.
- Baste off on the inside and remove the threads. You can make the erasable pen disappear by briefly holding the iron against it.
- This is the simplest pattern. If you have a taste for it, do an internet search for ‘sashiko mending’ and you will come across the most beautiful patterns you can create.
- You can also try visible Sashiko mending. This is similar to the previous solution, only now you don't put your piece of fabric behind your hole, but rather over the hole. Otherwise, the procedure is exactly the same. This is also a good way to hide a stain.