
You can hardly avoid it, the shop windows have been full of hearts for Valentine's Day for weeks now. Some think it's commercial nonsense, for others the heart beats a little harder around that 14e February. Actually, every day it is nice to let the people around you know that you are happy with them! Of course, this does not have to be a store-bought gift. And homemade is more personal. DIY queen Melanie therefore went to work especially for Valentine's Day with a DIY Valentine's Day heart made of household materials. Fun to decorate your home with, exciting to send to your Secret Valentine And also kind to the world!
Getting started with a DIY Valentine's Day heart
The day when birds start mating, a reference to the Roman priest Valentinus who helped and healed the sick, elderly and poor, a pagan festival. The stories about the origins of Valentine's Day vary quite a bit. It is, however, the second (New Year's Day) most celebrated festival in the world, although it does not provide a day off in almost any country. In Malaysia, Iran, Russia, Saudi Arabia, Indonesia and Pakistan, Valentine's Day is banned and in Argentina they even celebrate an entire week of Valentine's on top of another week of love in June.
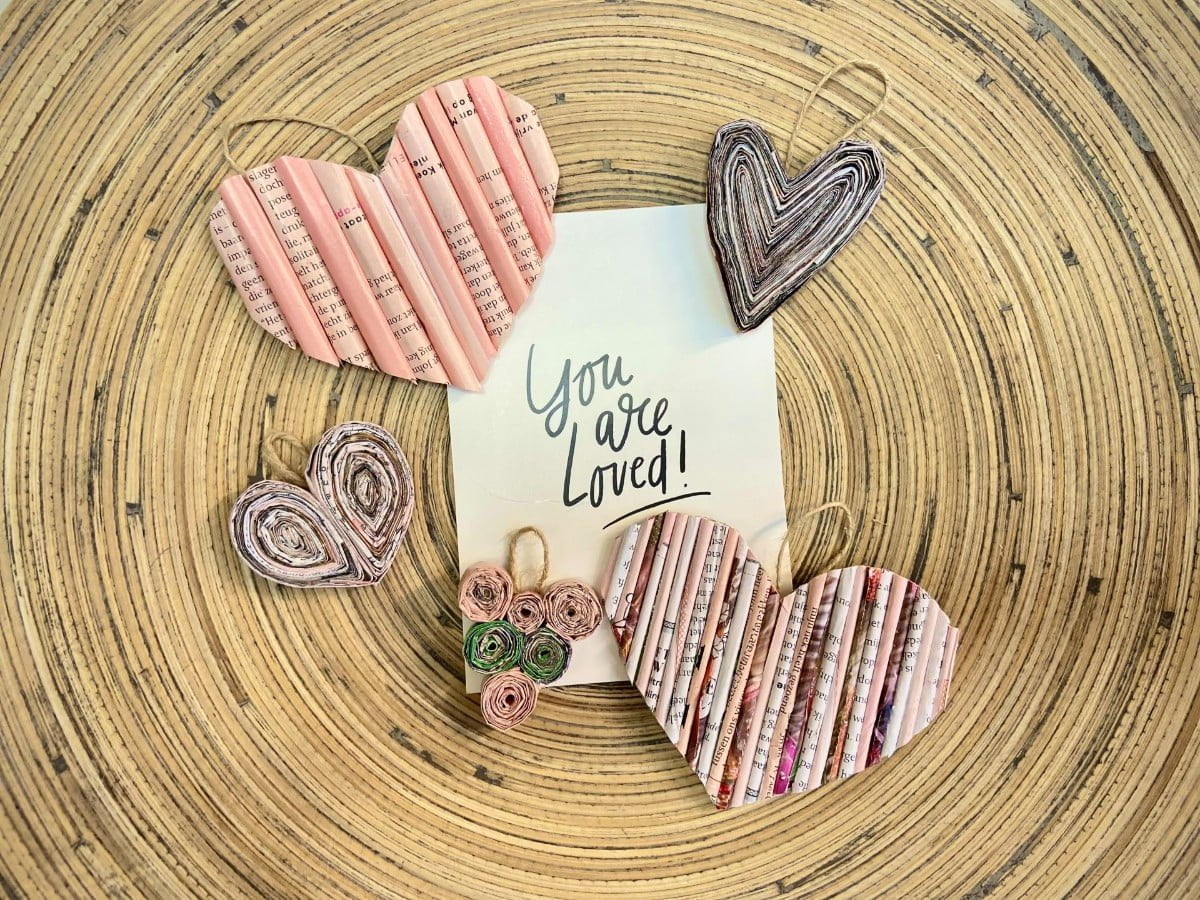
To also let your friends, neighbours, colleagues or the teacher know that you are happy for them, I would like to show you how to make really cute hearts from materials you probably have at home! With the instructions below, you can make as many as five different hearts.
Supplies for a DIY Valentine's Day heart:
- Magazine (Make sure you use a magazine with not too thick paper).
- Cardboard (from a packaging)
- Ruler
- Craft glue
- Folding leg or an old (bank) card
- Skewer
- Pencil or pencil
- Scissors
- Glue gun (not necessary, but handy)
- Piece of string


The base of the Valentine's heart are these rolls of old magazines.
Instructions:
- Take a page out of the magazine.
- Place the ruler against the long side of the page and tear off the paper along the ruler. You now have a strip as wide as the ruler. Lay the paper along the line again, making several strips. It doesn't matter if there are torn edges, as we will fold them in anyway.
- Fold the strip in half by laying the long sides together and use the folding leg (or a pass), to make a good sharp fold.
- Unfold the strip again and now fold both long sides to the centre fold you made in the previous step. Again, use your folding leg to make a sharp fold.
- Now fold the strip in half again by folding the long sides together. The torn edges are now inside. Use your folding leg again to make a sharp fold. This is important to be able to continue rolling properly later.
- Repeat and make several strips, how many you need depends on how big you want to make the hearts.


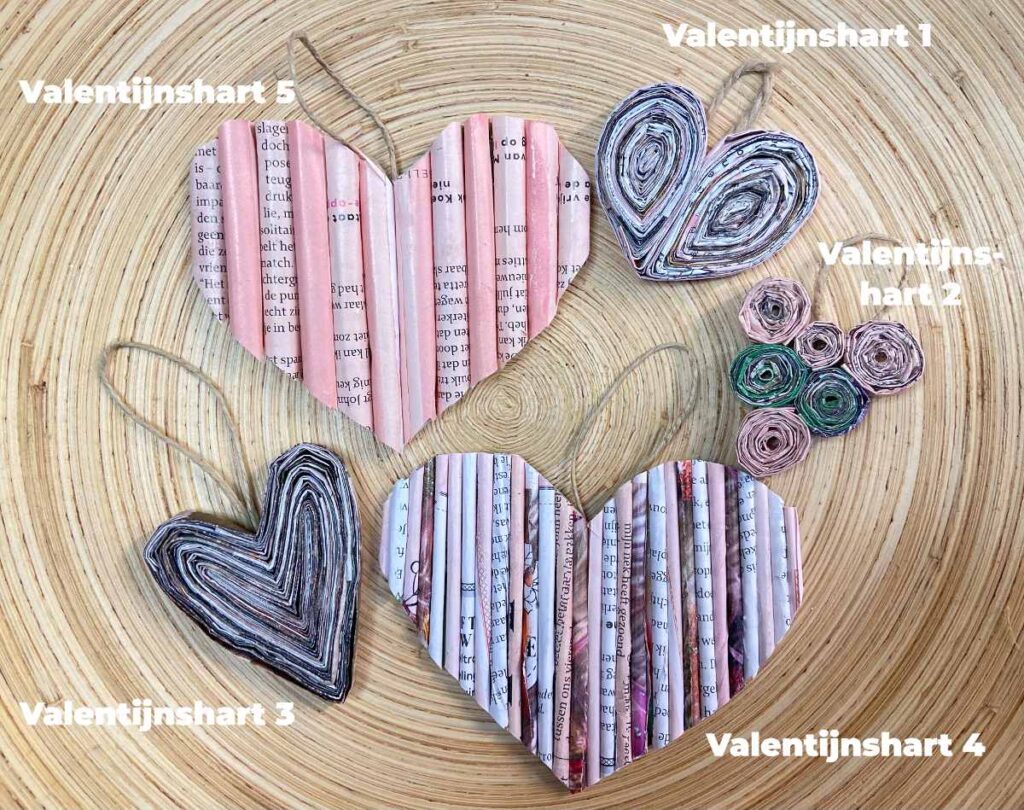
Then you are going to roll the rolls up again too, making variant 1 and 2.
Variant Valentine's heart 1
- Roll up the strip of paper. It is easier to do this using a skewer. Spread some dots of glue over the strip and start rolling.
- At the end of the strip, put a dot of glue on the inside of the strip and slide the next strip in between. Spread some dots on the strip and continue rolling.
- Repeat the steps until your roll is big enough.
- With your thumb and index finger, now make a point on your roll by squeezing it at one end. You make a drop shape.
- Repeat steps 1 to 4.
- Glue both drops together with the glue gun.
- Glue another strip around the heart for a nice finish.
- Glue a string to the back using the glue gun to hang the heart.
Variant Valentine's heart 2
- Follow steps 1 to 3 of Valentine's Heart 1 and make rolls of different sizes.
- Using the glue gun, glue the rolls together in a heart shape.
- Glue a string to the back using the glue gun to hang the heart.
TIP: Make a template out of cardboard. You can also stick the rolls onto a cardboard if you find that easier.


You can also fold the roll differently and you will get Valentine's heart number 3.
Variant Valentine's heart 3
- At the beginning of your strip, make a V-shape (about 2 cm), glue this in place. Put some dots of glue on the rest of the strip and glue the strip around the V-shape. Try to keep the V in shape.
- At the end of the strip, put a dot of glue on the inside of the strip and slide the next strip in between. Spread some dots of glue over the strip and continue folding the strip around the V-shape.
- Repeat the steps until your heart is big enough. As you fold the strips, try to keep the heart shape in.
- Glue a string to the back using the glue gun to hang the heart.


And that's how you make heart numbers 4 and 5.
Variant Valentine's heart 4
- For this heart, use the strips without folding them. Roll the long side of the strip around the skewer. Secure the roll with some glue.
- Make several rolls
- On a piece of double-folded cardboard, draw half of a heart and cut it out.
- Glue the heart all the way in and glue the rolls on top. You can use the printed side of the cardboard for this as you are going to glue the heart all over with the rolls.
- Let the glue dry a little.
- Trim the rolls by cutting along the cardboard heart at the back.
- Glue a string to the back using the glue gun to hang the heart.
TIP 1: I found rolling easier with slightly shorter strips. I therefore made the strips for the rolls from the short side of the magazine page
TIP 2: Make two identical hearts and stick them together with the string in between.
Variant Valentine's heart 5
Follow the steps of heart 4, but now roll the strips around a pencil or pen so that you get thicker rolls.
Who will you send your DIY Valentine's Day heart to?
You can hang the DIY Valentine hearts, craft several and make them into a garland or stick them on a card and send them as a Valentine card for your Valentine!
More DIY tips from thegreenlist.nl
- Also a nice gift to give: lip balm. You can make your own lip balm in no time with this DIY recipe.
- Or how about a plant pendant made from an old T-shirt?
- Want to give a flower on Valentine's Day? Then choose a sustainable flower!
Photo credits: Melanie de Oliveira.